


Today we’re going to talk about how to perform initial access to UFISPACE devices with IP Infusion’s OcNOS operating system.
The first time you access the device, you must use a serial cable. Most computers today do not have a serial port, so you can use a USB-to-RJ45 console adapter, as shown in the photo:
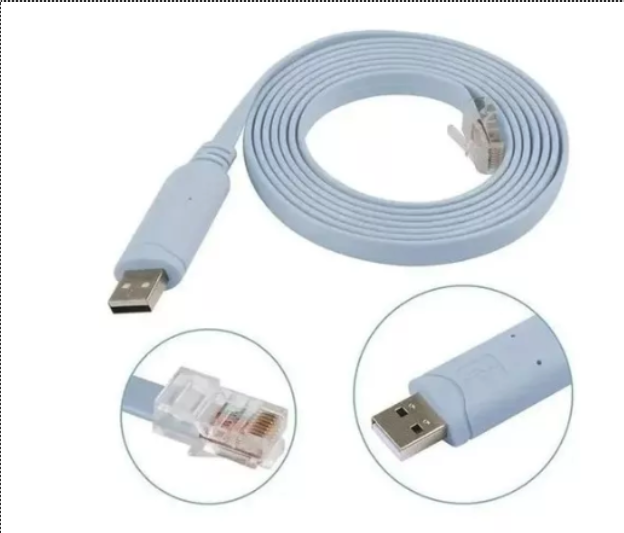
With the cable in hand, connect the RJ45 side to the console port of the UFISPACE device, as shown in the example below:
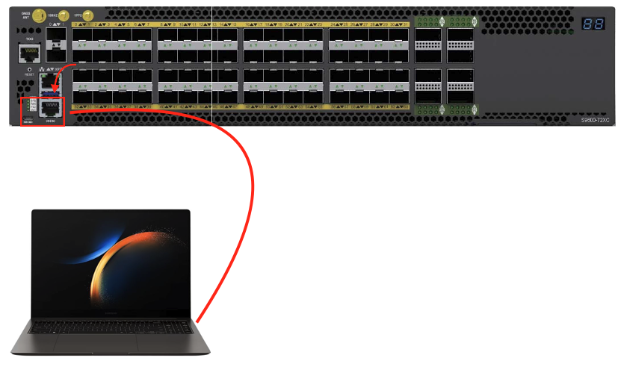
With the physical connection between the computer and UFISPACE, we can then use software, such as teraterm, putty, among others to make the initial access.
In this example, we’ll demonstrate how to do it using Putty.
To do this, open PuTTY and enter the information as shown below:
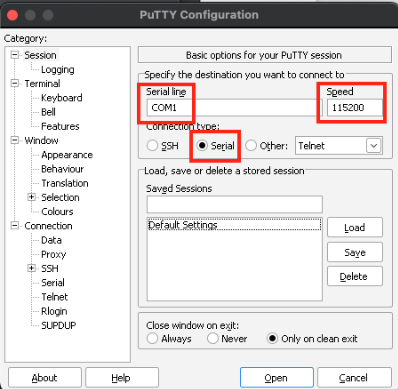
In Serial line, enter the name of your computer’s COM interface. This can vary according to each device.
Speed access to UFISPACE must be set to 115200.
When you log in via the console, you’ll be taken to the username and password prompt screen, which by default displays the username “ocnos” and password “ocnos”:
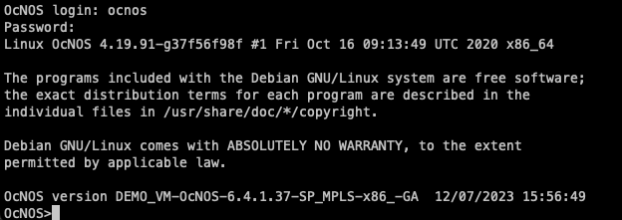
After logging in via the console, the first recommendation is to change the ocnos user’s password to a stronger one. To do this, follow these steps:
1 – Enter enable mode:
OcNOS>enable2 – Enter configuration mode:
OcNOS#configure terminal3 – Change the user’s password and create a new user, as shown in the example:
OcNOS(config)#username ocnos password S3nh4-Super-F0rt3
OcNOS(config)#username made4it password S3nh4-Super-F0rtissima
OcNOS(config)#username made4it role network-admin
4 – Alterar o nome do equipamento: hostname UFISPACE-015 – Apply the configuration:
OcNOS(config)#commit6 – Finally, save the configuration:
OcNOS(config)#do write
Building configuration…
[OK]
Now, let’s set up a management interface.
By default, UFISPACE equipment comes with the “eth0” interface for use with out-of-band management.
A good practice is to leave management only in a management VRF, with access controlled only through that VRF.
To do this, follow these steps:
1 – Accesses the eth0 interface:
OcNOS(config)#interface eth02 – Assign VRF management to the interface:
OcNOS(config-if)#ip vrf forwarding management3 – Configures the management IP and interface description:
OcNOS(config-if)#ip address 10.10.0.2/30
OcNOS(config-if)#description GERENCIA
4 – Apply settings and save:
OcNOS(config)#commit
OcNOS(config-if)#do write
Building configuration…
[OK]
To validate the interface configuration, we can use the “show ip interface brief” command, as shown in the example:
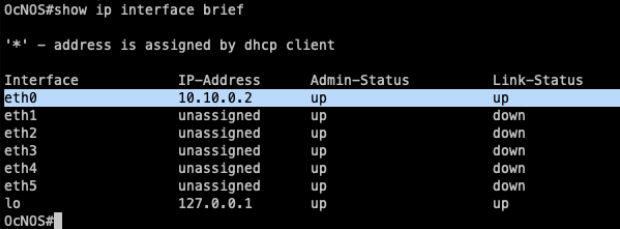
If you are in configuration mode, use the command “do show ip interface brief”
To configure the default route in the vrf, we use the following command:
OcNOS(config)#ip route vrf management 0.0.0.0/0 10.10.0.1 eth0 description ROTA DEFAULT
OcNOS(config)#commit
To validate the default route in the VRF, we can use the command:
OcNOS#show ip route vrf management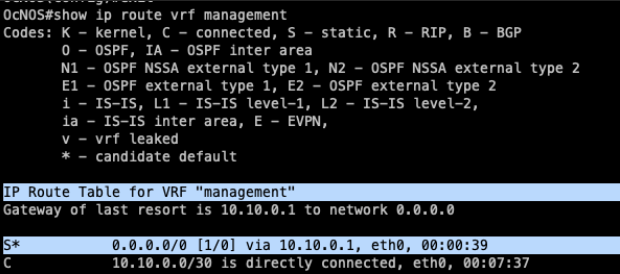
By default, ssh is already enabled in vrf management, if you want to disable it, use the command:
OcNOS(config)#no feature ssh vrf managementTo enable SSH on vrf main, use the command:
OcNOS(config)#feature ssh
OcNOS(config)#commit
Finally, it is important to set up ACLs to protect SSH access and only allow networks that can actually access the equipment.
Let’s then configure the ACL that contains our admin networks, which in this case will be 10.10.0.0/30 and 172.16.0.0/24:
OcNOS(config)#ip access-list admin
OcNOS(config-ip-acl)#10 permit tcp 10.10.0.0/30 any eq ssh
OcNOS(config-ip-acl)#20 permit tcp 172.16.0.0/24 any eq ssh
OcNOS(config-ip-acl)#65000 deny any any any
OcNOS(config-ip-acl)#commit
Now we need to apply the ACL to line vty:
OcNOS(config)#line vty
OcNOS(config-all-line)#ip access-group admin in
OcNOS(config-all-line)#commit
OcNOS(config-all-line)#do write
Building configuration…
[OK]
Testing ssh access with a newly created user:
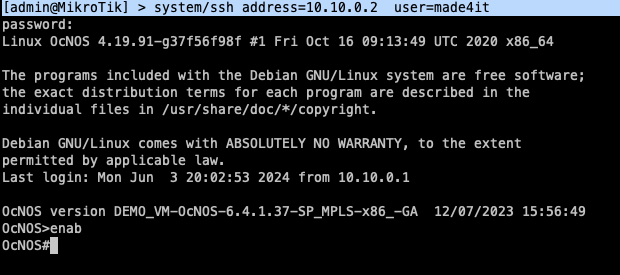
We can see that the access worked correctly.
Now let’s test whether the ACL we created for protection is working.
In this case, we’re going to use IP 172.20.0.1 as the source for accessing the device:
We can see that ping works normally:

However, it does not give us SSH access, confirming that the ACL is working correctly:

Now let’s configure SNMP to monitor a system like Zabbix.
To enable SNMP in vrf management, use the command:
UFISPACE-01(config)#snmp-server enable snmp vrf management
UFISPACE-01(config)#snmp-server community made4it vrf management
UFISPACE-01(config)#commit
If you use the vrf main to perform monitoring, simply use the following commands:
UFISPACE-01(config)#snmp-server enable snmp
UFISPACE-01(config)#snmp-server community made4it-vrf-main
UFISPACE-01(config)#commit
It is important that we keep the time of the device correct so that we can validate logs for troubleshooting with the correct local time. To do this, let’s configure NTP to update the date and time:
UFISPACE-01(config)#feature ntp vrf management
UFISPACE-01(config)#ntp enable vrf management
UFISPACE-01(config)#ntp server 200.160.7.186 vrf management
UFISPACE-01(config)#commit
To check the NTP peers, we use the following command:
#show ntp peers
-----------------------------------------------------------
Peer IP Address Serv/Peer
-----------------------------------------------------------
200.160.7.186 Server (configured)

#show ntp peer-status
Total peers : 1
* - selected for sync, + - peer mode(active),
- - peer mode(passive), = - polled in client mode
remote refid st t when poll reach delay offset jitter
==============================================================================
* 200.160.7.186 LOCAL(0) 7 u 14 32 37 0.194 -4.870 3.314
Now we have to correct the timezone so that the time is correct:
UFISPACE-01(config)#clock timezone Sao_Paulo
UFISPACE-01(config)#commit
Another important feature is the possibility of using “commit confirmed” with timeout, to use in cases of configurations that may cause network downtime.
Let’s do an example by changing the hostname and applying a commit confirmed timeout of 10 seconds:
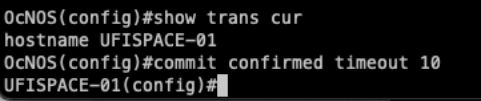
If the commit is not confirmed, the configuration will revert to the previous configuration:

To confirm the commit, we use the “confirm-commit” command.

Conclusion
After completing the initial settings, the device will be ready to respond to SSH access via the network to the IPs authorized in the firewall and with the users configured. SNMP monitoring can also query the information using the Community created. If you have any questions about the initial configuration of UFISPACE, please contact us so that we can help you.
