


Today I’m going to show you how to configure your CPE EC220-G5 using Made4Graph’s TR-069. I recommend doing this in a lab environment, since it will need to be approved, and to do that we’ll be changing some settings on your CPE via TR-069—and we don’t want a customer to be left without internet access.
Before beginning the configuration, it is essential that there be no NAT between the CPE and the TR-069 server on the network; if there is, it will compromise the functionality of TR-069, as stated in the protocol documentation.
Now that I’ve completed the prerequisites, let’s set up the CPE.
When you open CPE, go to the Advanced tab, then System Tools, and finally CWMP Settings.
When you reach the screen shown below, we will make the following settings:
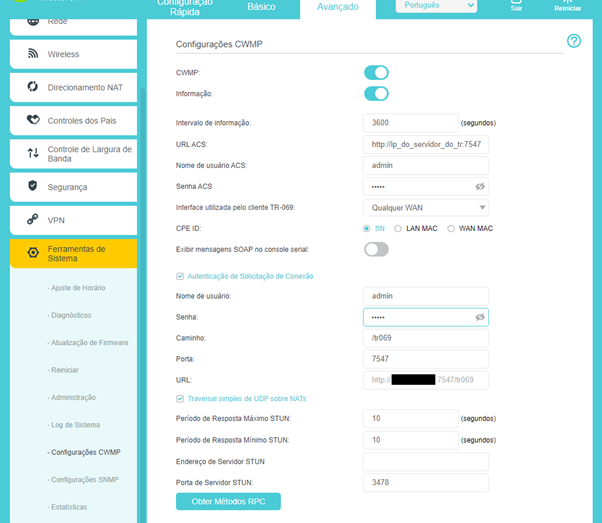
CWMP Settings:
→ The CWMP button must be enabled
→ The information button must be enabled
→ Information interval = 300
→ ACS URL = http://ip_do_server_de_tr:7547
→ ACS username = admin
→ ACS password = admin
→ Interface used by TR-069 = Any WAN
→ CPE ID = SN
→ Display SOAP Message button = disabled
→ The “Connection Request Authentication” checkbox must be checked
In the fields below the connection request box, you will be asked for a username and password; you should enter:
→ Username = admin
→ Password = admin
→ Path = /tr069
→ Port = 7547
The “Simple UDP Traversal over NATs” option can be enabled, but it does not need to be configured; the settings can be left at their defaults.
After that, click Save.
Shortly thereafter, the CPE should appear on made4graph, where it will be approved by our team

Some information has been redacted to keep CPE data confidential.
If you still have questions, send us a message, and we’ll help you with your CPE.
Don’t have the TR069 yet?
